Spring Cloud Gateway 是Spring Cloud官方推出的第二代网关框架,定位于取代 Netflix Zuul。相比 Zuul 来说,Spring Cloud Gateway 提供更优秀的性能,更强大的有功能
核心概念 路由是网关中最基础的部分,路由信息包括一个ID、一个目的URI、一组断言工厂、一组Filter组成。如果断言为真,则说明请求的URL和配置的路由匹配。
Java8中的断言函数,SpringCloud Gateway中的断言函数类型是Spring5.0框架中的ServerWebExchange。断言函数允许开发者去定义匹配Http request中的任何信息,比如请求头和参数等。
SpringCloud Gateway中的filter分为Gateway FilIer和Global Filter。Filter可以对请求和响应进行处理。
工作原理 Spring Cloud Gateway 的工作原理跟 Zuul 的差不多,最大的区别就是 Gateway 的 Filter 只有 pre 和 post 两种。
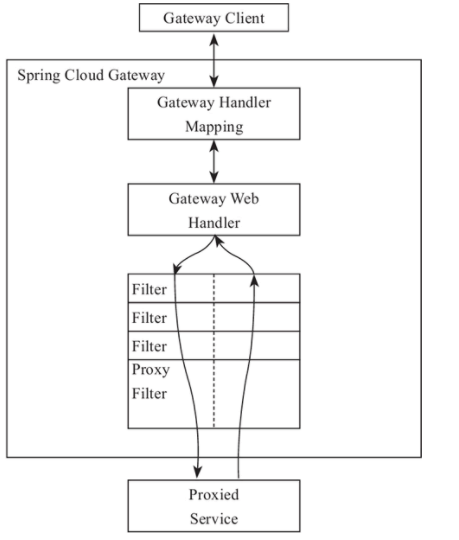
客户端向 Spring Cloud Gateway 发出请求,如果请求与网关程序定义的路由匹配,则该请求就会被发送到网关 Web 处理程序,此时处理程序运行特定的请求过滤器链。
过滤器之间用虚线分开的原因是过滤器可能会在发送代理请求的前后执行逻辑。所有 pre 过滤器逻辑先执行,然后执行代理请求;代理请求完成后,执行 post 过滤器逻辑。
环境搭建 1) 引入依赖
1
2
3
4
5
6
7
8
9
10
11
<!-- gateway网关 --> <dependency> <groupId>org.springframework.cloud</groupId> <artifactId>spring-cloud-starter-gateway</artifactId> </dependency> <!-- nacos服务注册与发现 --> <dependency> <groupId>com.alibaba.cloud</groupId> <artifactId>spring-cloud-starter-alibaba-nacos-discovery</artifactId> </dependency>
注意:会和spring-webmvc的依赖冲突,需要排除spring-webmvc
2) 编写yml配置文件
1
2
3
4
5
6
7
8
9
10
11
12
13
14
15
16
17
18
19
server: port: 8888 spring: application: name: mall-gateway #配置nacos注册中心地址 cloud: nacos: discovery: server-addr: 127.0.0.1:8848 gateway: discovery: locator: # 默认为false,设为true开启通过微服务创建路由的功能,即可以通过微服务名访问服务 # http://localhost:8888/mall-order/order/findOrderByUserId/1 enabled: true # 是否开启网关 enabled: true
写注解 服务发现的注解,gateway没有注解
1
2
3
4
5
6
7
@SpringBootApplication @EnableDiscoveryClient public class Tulingvip08MsCloudGatewayApplication { public static void main(String[] args) { SpringApplication.run(Tulingvip08MsCloudGatewayApplication.class, args); } }
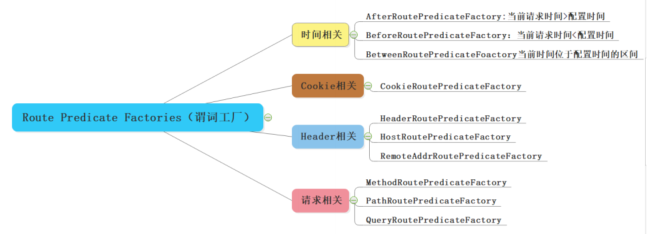
路由断言工厂
时间匹配 1 2 3 4 5 6 7 8 9 10 11 spring: cloud: gateway: #设置路由:路由id、路由到微服务的uri、断言 routes: - id: order_route #路由ID,全局唯一 uri: http://localhost:8020 #目标微服务的请求地址和端口 predicates: # 测试:http://localhost:8888/order/findOrderByUserId/1 # 匹配在指定的日期时间之后发生的请求 入参是ZonedDateTime类型 - After=2021-01-31T22:22:07.783+08:00[Asia/Shanghai]
获取ZonedDateTime类型的指定日期时间
1 2 3 ZonedDateTime zonedDateTime = ZonedDateTime.now();//默认时区 // 用指定时区获取当前时间 ZonedDateTime zonedDateTime2 = ZonedDateTime.now(ZoneId.of("Asia/Shanghai"));
Cookie匹配 1 2 3 4 5 6 7 8 9 10 spring: cloud: gateway: #设置路由:路由id、路由到微服务的uri、断言 routes: - id: order_route #路由ID,全局唯一 uri: http://localhost:8020 #目标微服务的请求地址和端口 predicates: # Cookie匹配 - Cookie=username, fox
1 2 3 4 5 6 7 8 9 10 spring: cloud: gateway: #设置路由:路由id、路由到微服务的uri、断言 routes: - id: order_route #路由ID,全局唯一 uri: http://localhost:8020 #目标微服务的请求地址和端口 predicates: # Header匹配 请求中带有请求头名为 x-request-id,其值与 \d+ 正则表达式匹配 #- Header=X-Request-Id, \d+
路径匹配 1 2 3 4 5 6 7 8 9 10 spring: cloud: gateway: #设置路由:路由id、路由到微服务的uri、断言 routes: - id: order_route #路由ID,全局唯一 uri: http://localhost:8020 #目标微服务的请求地址和端口 predicates: # 测试:http://localhost:8888/order/findOrderByUserId/1 - Path=/order/** #Path路径匹配
自定义路由断言工厂 自定义路由断言工厂需要继承 AbstractRoutePredicateFactory 类,重写 apply 方法的逻辑。在 apply 方法中可以通过 exchange.getRequest() 拿到 ServerHttpRequest 对象,从而可以获取到请求的参数、请求方式、请求头等信息。
注意: 命名需要以 RoutePredicateFactory 结尾
1 2 3 4 5 6 7 8 9 10 11 12 13 14 15 16 17 18 19 20 21 22 23 24 25 26 27 28 29 30 31 32 33 34 35 36 37 38 39 40 41 42 43 44 45 @Component @Slf4j public class CheckAuthRoutePredicateFactory extends AbstractRoutePredicateFactory<CheckAuthRoutePredicateFactory.Config> { public CheckAuthRoutePredicateFactory() { super(Config.class); } @Override public Predicate<ServerWebExchange> apply(Config config) { return new GatewayPredicate() { @Override public boolean test(ServerWebExchange serverWebExchange) { log.info("调用CheckAuthRoutePredicateFactory" + config.getName()); if(config.getName().equals("fox")){ return true; } return false; } }; } /** * 快捷配置 * @return */ @Override public List<String> shortcutFieldOrder() { return Collections.singletonList("name"); } public static class Config { private String name; public String getName() { return name; } public void setName(String name) { this.name = name; } } }
yml中配置
1 2 3 4 5 6 7 8 9 10 11 12 13 14 15 spring: cloud: gateway: #设置路由:路由id、路由到微服务的uri、断言 routes: - id: order_route #路由ID,全局唯一 uri: http://localhost:8020 #目标微服务的请求地址和端口 predicates: # 测试:http://localhost:8888/order/findOrderByUserId/1 - Path=/order/** #Path路径匹配 #自定义CheckAuth断言工厂 # - name: CheckAuth # args: # name: fox - CheckAuth=fox
过滤器工厂( GatewayFilter Factories)配置 SpringCloudGateway 内置了很多的过滤器工厂,我们通过一些过滤器工厂可以进行一些业务逻辑处理器,比如添加剔除响应头,添加去除参数等
添加请求头 1 2 3 4 5 6 7 8 9 10 spring: cloud: gateway: #设置路由:路由id、路由到微服务的uri、断言 routes: - id: order_route #路由ID,全局唯一 uri: http://localhost:8020 #目标微服务的请求地址和端口 #配置过滤器工厂 filters: - AddRequestHeader=X-Request-color, red #添加请求头
添加请求参数 1 2 3 4 5 6 7 8 9 10 spring: cloud: gateway: #设置路由:路由id、路由到微服务的uri、断言 routes: - id: order_route #路由ID,全局唯一 uri: http://localhost:8020 #目标微服务的请求地址和端口 #配置过滤器工厂 filters: - AddRequestParameter=color, blue # 添加请求参数
为匹配的路由统一添加前缀 1 2 3 4 5 6 7 8 9 10 spring: cloud: gateway: #设置路由:路由id、路由到微服务的uri、断言 routes: - id: order_route #路由ID,全局唯一 uri: http://localhost:8020 #目标微服务的请求地址和端口 #配置过滤器工厂 filters: - PrefixPath=/mall-order # 添加前缀 对应微服务需要配置context-path
mall-order中需要配置
1 2 3 server: servlet: context-path: /mall-order
重定向操作 1 2 3 4 5 6 7 8 9 10 spring: cloud: gateway: #设置路由:路由id、路由到微服务的uri、断言 routes: - id: order_route #路由ID,全局唯一 uri: http://localhost:8020 #目标微服务的请求地址和端口 #配置过滤器工厂 filters: - RedirectTo=302, https://www.baidu.com/ #重定向到百度
自定义过滤器工厂 继承AbstractNameValueGatewayFilterFactory且我们的自定义名称必须要以GatewayFilterFactory结尾并交给spring管理。
1 2 3 4 5 6 7 8 9 10 11 12 13 @Component @Slf4j public class CheckAuthGatewayFilterFactory extends AbstractNameValueGatewayFilterFactory { @Override public GatewayFilter apply(NameValueConfig config) { return (exchange, chain) -> { log.info("调用CheckAuthGatewayFilterFactory===" + config.getName() + ":" + config.getValue()); return chain.filter(exchange); }; } }
配置自定义的过滤器工厂
1
2
3
4
5
6
7
8
9
10
spring: cloud: gateway: #设置路由:路由id、路由到微服务的uri、断言 routes: - id: order_route #路由ID,全局唯一 uri: http://localhost:8020 #目标微服务的请求地址和端口 #配置过滤器工厂 filters: - CheckAuth=fox,男
全局过滤器(Global Filters)配置 GlobalFilter 接口和 GatewayFilter 有一样的接口定义,只不过, GlobalFilter 会作用于所有路由。
LoadBalancerClientFilter LoadBalancerClientFilter 会查看exchange的属性 ServerWebExchangeUtils.GATEWAY_REQUEST_URL_ATTR 的值(一个URI),如果该值的scheme是 lb,比如:lb://myservice ,它将会使用Spring Cloud的LoadBalancerClient 来将 myservice 解析成实际的host和port,并替换掉 ServerWebExchangeUtils.GATEWAY_REQUEST_URL_ATTR 的内容。
其实就是用来整合负载均衡器Ribbon的
1 2 3 4 5 6 7 8 spring: cloud: gateway: routes: - id: order_route uri: lb://mall-order predicates: - Path=/order/**
自定义全局过滤器 1 2 3 4 5 6 7 8 9 10 11 12 13 14 15 16 17 18 19 20 21 22 23 24 25 26 27 28 29 30 31 32 33 34 35 36 37 38 @Component @Order(-1) @Slf4j public class CheckAuthFilter implements GlobalFilter { @Override public Mono<Void> filter(ServerWebExchange exchange, GatewayFilterChain chain) { //校验请求头中的token List<String> token = exchange.getRequest().getHeaders().get("token"); log.info("token:"+ token); if (token.isEmpty()){ return null; } return chain.filter(exchange); } } @Component public class CheckIPFilter implements GlobalFilter, Ordered { @Override public int getOrder() { return 0; } @Override public Mono<Void> filter(ServerWebExchange exchange, GatewayFilterChain chain) { HttpHeaders headers = exchange.getRequest().getHeaders(); //模拟对 IP 的访问限制,即不在 IP 白名单中就不能调用的需求 if (getIp(headers).equals("127.0.0.1")) { return null; } return chain.filter(exchange); } private String getIp(HttpHeaders headers) { return headers.getHost().getHostName(); } }
Gateway跨域配置(CORS Configuration) 通过yml配置的方式
https://docs.spring.io/spring-cloud-gateway/docs/current/reference/html/#cors-configuration
1 2 3 4 5 6 7 8 9 10 11 12 13 spring: cloud: gateway: globalcors: cors-configurations: '[/**]': allowedOrigins: "*" allowedMethods: - GET - POST - DELETE - PUT - OPTION
通过java配置的方式
1 2 3 4 5 6 7 8 9 10 11 12 13 14 15 @Configuration public class CorsConfig { @Bean public CorsWebFilter corsFilter() { CorsConfiguration config = new CorsConfiguration(); config.addAllowedMethod("*"); config.addAllowedOrigin("*"); config.addAllowedHeader("*"); UrlBasedCorsConfigurationSource source = new UrlBasedCorsConfigurationSource(new PathPatternParser()); source.registerCorsConfiguration("/**", config); return new CorsWebFilter(source); } }
gateway整合sentinel限流 从 1.6.0 版本开始,Sentinel 提供了 Spring Cloud Gateway 的适配模块,可以提供两种资源维度的限流:
route 维度:即在 Spring 配置文件中配置的路由条目,资源名为对应的 routeId
自定义 API 维度:用户可以利用 Sentinel 提供的 API 来自定义一些 API 分组
快速开始 使用时需引入依赖:
1 2 3 4 5 <dependency> <groupId>com.alibaba.csp</groupId> <artifactId>sentinel-spring-cloud-gateway-adapter</artifactId> <version>x.y.z</version> </dependency>
接入sentinel dashboard,添加yml配置
1 2 3 4 5 6 7 8 9 10 11 12 13 spring: application: name: mall-gateway-sentinel-demo #配置nacos注册中心地址 cloud: nacos: discovery: server-addr: 127.0.0.1:8848 sentinel: transport: # 添加sentinel的控制台地址 dashboard: 127.0.0.1:8080
使用时只需注入对应的 SentinelGatewayFilter 实例以及 SentinelGatewayBlockExceptionHandler 实例即可
1 2 3 4 5 6 7 8 9 10 11 12 13 14 15 16 17 18 19 20 21 22 23 24 25 26 27 28 29 30 31 32 33 34 @Configuration public class GatewayConfiguration { private final List<ViewResolver> viewResolvers; private final ServerCodecConfigurer serverCodecConfigurer; public GatewayConfiguration(ObjectProvider<List<ViewResolver>> viewResolversProvider, ServerCodecConfigurer serverCodecConfigurer) { this.viewResolvers = viewResolversProvider.getIfAvailable(Collections::emptyList); this.serverCodecConfigurer = serverCodecConfigurer; } /** * 限流异常处理器 * @return */ @Bean @Order(Ordered.HIGHEST_PRECEDENCE) public SentinelGatewayBlockExceptionHandler sentinelGatewayBlockExceptionHandler() { // Register the block exception handler for Spring Cloud Gateway. return new SentinelGatewayBlockExceptionHandler(viewResolvers, serverCodecConfigurer); } /** * 限流过滤器 * @return */ @Bean @Order(Ordered.HIGHEST_PRECEDENCE) public GlobalFilter sentinelGatewayFilter() { return new SentinelGatewayFilter(); } }
用户可以通过 GatewayRuleManager.loadRules(rules) 手动加载网关规则
GatewayConfiguration中添加
1 2 3 4 5 6 7 8 9 10 11 12 13 14 15 16 17 18 19 20 21 22 23 24 25 26 27 28 29 30 31 32 33 34 35 36 37 38 39 40 41 42 43 44 45 46 47 48 49 50 51 52 53 54 55 @PostConstruct public void doInit() { //初始化自定义的API initCustomizedApis(); //初始化网关限流规则 initGatewayRules(); //自定义限流异常处理器 initBlockRequestHandler(); } private void initCustomizedApis() { Set<ApiDefinition> definitions = new HashSet<>(); ApiDefinition api = new ApiDefinition("user_service_api") .setPredicateItems(new HashSet<ApiPredicateItem>() {{ add(new ApiPathPredicateItem().setPattern("/user/**") .setMatchStrategy(SentinelGatewayConstants.URL_MATCH_STRATEGY_PREFIX)); }}); definitions.add(api); GatewayApiDefinitionManager.loadApiDefinitions(definitions); } private void initGatewayRules() { Set<GatewayFlowRule> rules = new HashSet<>(); //resource:资源名称,可以是网关中的 route 名称或者用户自定义的 API 分组名称。 //count:限流阈值 //intervalSec:统计时间窗口,单位是秒,默认是 1 秒。 rules.add(new GatewayFlowRule("order_route") .setCount(2) .setIntervalSec(1) ); rules.add(new GatewayFlowRule("user_service_api") .setCount(2) .setIntervalSec(1) ); // 加载网关规则 GatewayRuleManager.loadRules(rules); } private void initBlockRequestHandler() { BlockRequestHandler blockRequestHandler = new BlockRequestHandler() { @Override public Mono<ServerResponse> handleRequest(ServerWebExchange exchange, Throwable t) { HashMap<String, String> result = new HashMap<>(); result.put("code",String.valueOf(HttpStatus.TOO_MANY_REQUESTS.value())); result.put("msg", HttpStatus.TOO_MANY_REQUESTS.getReasonPhrase()); return ServerResponse.status(HttpStatus.TOO_MANY_REQUESTS) .contentType(MediaType.APPLICATION_JSON) .body(BodyInserters.fromValue(result)); } }; //设置自定义异常处理器 GatewayCallbackManager.setBlockHandler(blockRequestHandler); }
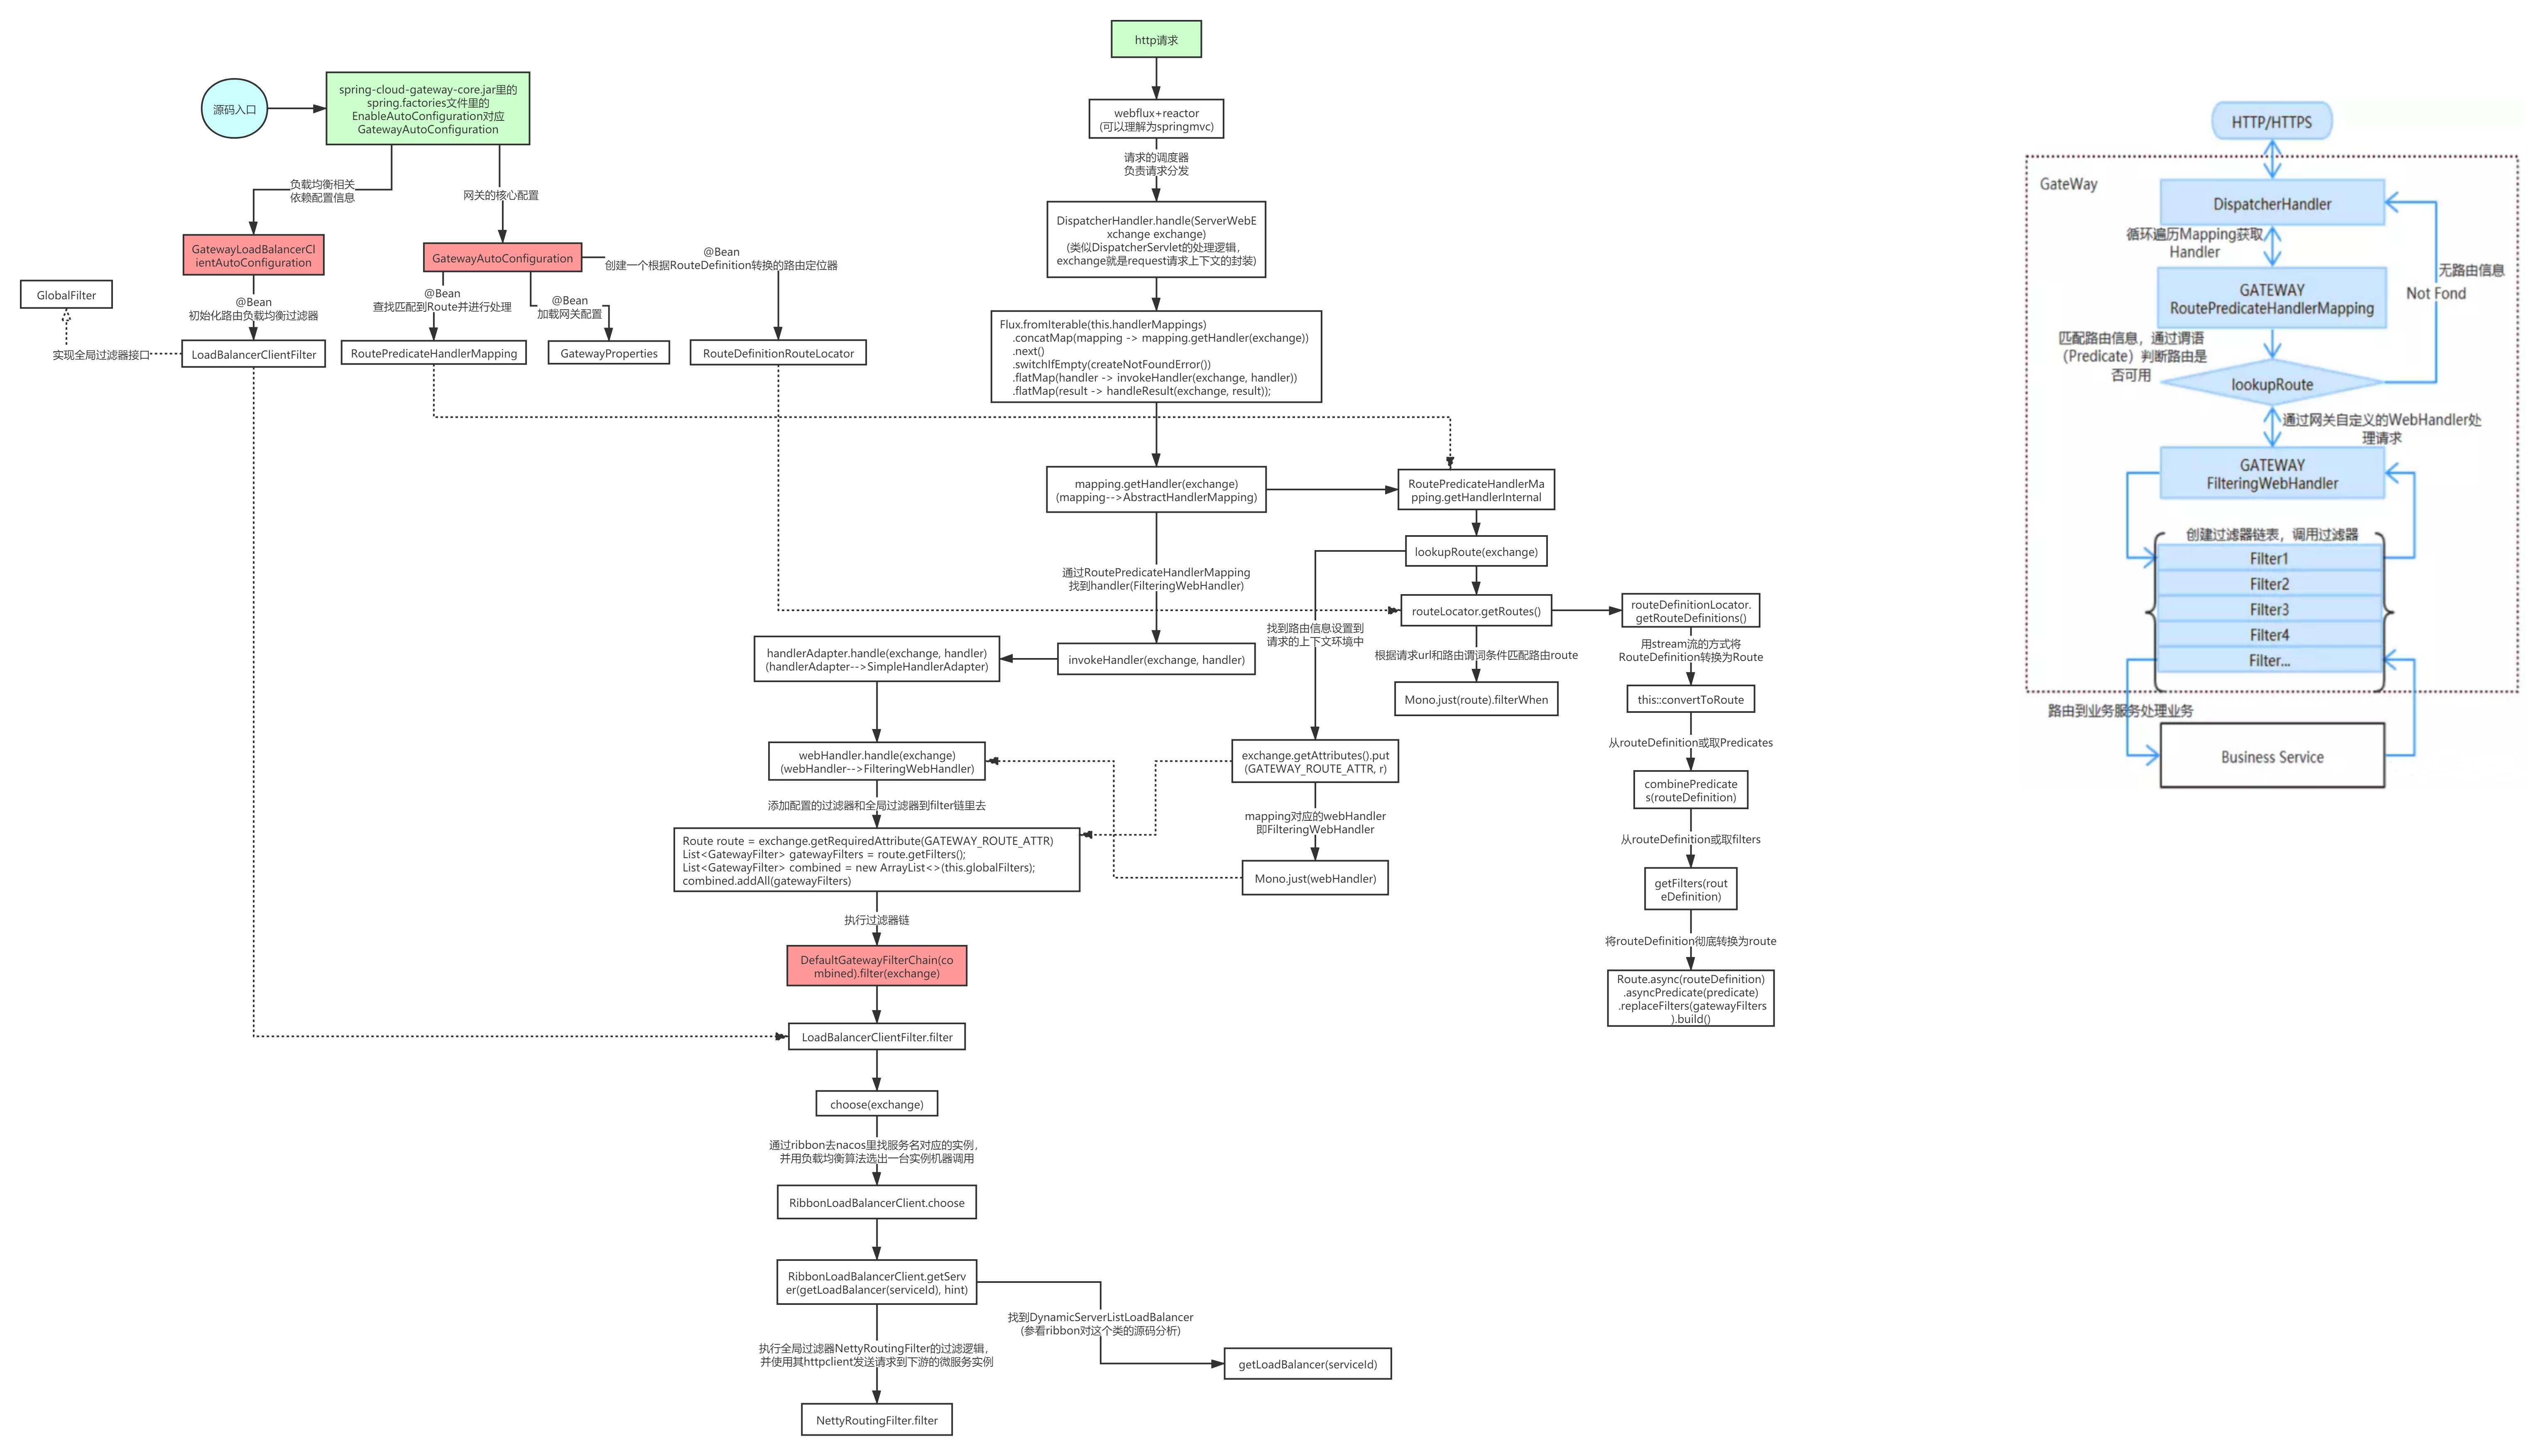
源码架构图
参考链接