文的目的就是一探springboot启动源码
SpringBoot 如何通过jar包启动 得益于SpringBoot的封装,我们可以只通过jar -jar一行命令便启动一个web项目。再也不用操心搭建tomcat等相关web容器。那么,你是否探究过SpringBoot是如何达到这一操作的呢?只有了解了底层实现原理,才能更好的掌握该项技术带来的好处以及性能调优。本篇文章带大家聊一探究竟。
java -jar做了什么
先要弄清楚java -jar命令做了什么,在oracle官网 找到了该命令的描述:
If the -jar option is specified, its argument is the name of the JAR file containing class and resource files for the application. The startup class must be indicated by the Main-Class manifest header in its source code.
使用-jar参数时,后面的参数是的jar文件名(本例中是springbootstarterdemo-0.0.1-SNAPSHOT.jar);
该jar文件中包含的是class和资源文件;
在manifest文件中有Main-Class的定义;
Main-Class的源码中指定了整个应用的启动类;(in its source code)
小结一下:
java -jar会去找jar中的manifest文件,在那里面找到真正的启动类;
在MANIFEST.MF文件中有这么一行内容:
1 Start-Class: com.tulingxueyuan.Application
前面的java官方文档中,只提到过Main-Class ,并没有提到Start-Class;
Start-Class的值是com.tulingxueyuan.Application,这是我们的java代码中的唯一类,也只真正的应用启动类;
所以问题就来了:理论上看,执行java -jar命令时JarLauncher类会被执行,但实际上是com.tulingxueyuan.Application被执行了,这其中发生了什么呢?为什么要这么做呢?
Java没有提供任何标准的方式来加载嵌套的jar文件(即,它们本身包含在jar中的jar文件)。
Jar包的打包插件及核心方法 Spring Boot项目的pom.xml文件中默认使用如下插件进行打包:
1
2
3
4
5
6
7
8
<build> <plugins> <plugin> <groupId>org.springframework.boot</groupId> <artifactId>spring-boot-maven-plugin</artifactId> </plugin> </plugins> </build>
执行maven clean package之后,会生成两个文件:
1
2
spring-learn-0.0.1-SNAPSHOT.jar spring-learn-0.0.1-SNAPSHOT.jar.original
spring-boot-maven-plugin项目存在于spring-boot-tools目录中。spring-boot-maven-plugin默认有5个goals:repackage、run、start、stop、build-info。在打包的时候默认使用的是repackage。
spring-boot-maven-plugin的repackage能够将mvn package生成的软件包,再次打包为可执行的软件包,并将mvn package生成的软件包重命名为*.original。
spring-boot-maven-plugin的repackage在代码层面调用了RepackageMojo的execute方法,而在该方法中又调用了repackage方法。repackage方法代码及操作解析如下:
1
2
3
4
5
6
7
8
9
10
11
12
13
14
15
16
17
18
19
20
21
22
23
24
private void repackage() throws MojoExecutionException { // maven生成的jar,最终的命名将加上.original后缀 Artifact source = getSourceArtifact(); // 最终为可执行jar,即fat jar File target = getTargetFile(); // 获取重新打包器,将maven生成的jar重新打包成可执行jar Repackager repackager = getRepackager(source.getFile()); // 查找并过滤项目运行时依赖的jar Set<Artifact> artifacts = filterDependencies(this.project.getArtifacts(), getFilters(getAdditionalFilters())); // 将artifacts转换成libraries Libraries libraries = new ArtifactsLibraries(artifacts, this.requiresUnpack, getLog()); try { // 获得Spring Boot启动脚本 LaunchScript launchScript = getLaunchScript(); // 执行重新打包,生成fat jar repackager.repackage(target, libraries, launchScript); }catch (IOException ex) { throw new MojoExecutionException(ex.getMessage(), ex); } // 将maven生成的jar更新成.original文件 updateArtifact(source, target, repackager.getBackupFile()); }
执行以上命令之后,便生成了打包结果对应的两个文件。下面针对文件的内容和结构进行一探究竟。
jar包目录结构 首先来看看jar的目录结构,都包含哪些目录和文件,解压jar包可以看到如下结构:
1
2
3
4
5
6
7
8
9
10
11
12
13
spring-boot-learn-0.0.1-SNAPSHOT ├── META-INF │ └── MANIFEST.MF ├── BOOT-INF │ ├── classes │ │ └── 应用程序类 │ └── lib │ └── 第三方依赖jar └── org └── springframework └── boot └── loader └── springboot启动程序
META-INF内容
在上述目录结构中,META-INF记录了相关jar包的基础信息,包括入口程序等。
1
2
3
4
5
6
7
8
9
10
Manifest-Version: 1.0 Implementation-Title: spring-learn Implementation-Version: 0.0.1-SNAPSHOT Start-Class: com.tulingxueyuan.Application Spring-Boot-Classes: BOOT-INF/classes/ Spring-Boot-Lib: BOOT-INF/lib/ Build-Jdk-Spec: 1.8 Spring-Boot-Version: 2.1.5.RELEASE Created-By: Maven Archiver 3.4.0 Main-Class: org.springframework.boot.loader.JarLauncher
可以看到有Main-Class是org.springframework.boot.loader.JarLauncher ,这个是jar启动的Main函数。
还有一个Start-Class是com.tulingxueyuan.Application,这个是我们应用自己的Main函数。
Archive的概念 在继续了解底层概念和原理之前,我们先来了解一下Archive的概念:
archive即归档文件,这个概念在linux下比较常见。
通常就是一个tar/zip格式的压缩包。
jar是zip格式。
SpringBoot抽象了Archive的概念,一个Archive可以是jar(JarFileArchive),可以是一个文件目录(ExplodedArchive),可以抽象为统一访问资源的逻辑层。关于Spring Boot中Archive的源码如下:
1
2
3
4
5
6
7
8
public interface Archive extends Iterable<Archive.Entry> { // 获取该归档的url URL getUrl() throws MalformedURLException; // 获取jar!/META-INF/MANIFEST.MF或[ArchiveDir]/META-INF/MANIFEST.MF Manifest getManifest() throws IOException; // 获取jar!/BOOT-INF/lib/*.jar或[ArchiveDir]/BOOT-INF/lib/*.jar List<Archive> getNestedArchives(EntryFilter filter) throws IOException; }
SpringBoot定义了一个接口用于描述资源,也就是org.springframework.boot.loader.archive.Archive。该接口有两个实现,分别是org.springframework.boot.loader.archive.ExplodedArchive和org.springframework.boot.loader.archive.JarFileArchive。前者用于在文件夹目录下寻找资源,后者用于在jar包环境下寻找资源。而在SpringBoot打包的fatJar中,则是使用后者。
JarFile:对jar包的封装,每个JarFileArchive都会对应一个JarFile。JarFile被构造的时候会解析内部结构,去获取jar包里的各个文件或文件夹,这些文件或文件夹会被封装到Entry中,也存储在JarFileArchive中。如果Entry是个jar,会解析成JarFileArchive。
比如一个JarFileArchive对应的URL为:
1 jar:file:/Users/format/Develop/gitrepository/springboot-analysis/springboot-executable-jar/target/executable-jar-1.0-SNAPSHOT.jar!/
它对应的JarFile为:
1 /Users/format/Develop/gitrepository/springboot-analysis/springboot-executable-jar/target/executable-jar-1.0-SNAPSHOT.jar
这个JarFile有很多Entry,比如:
1
2
3
4
5
6
7
8
9
META-INF/ META-INF/MANIFEST.MF spring/ spring/study/ .... spring/study/executablejar/ExecutableJarApplication.class lib/spring-boot-starter-1.3.5.RELEASE.jar lib/spring-boot-1.3.5.RELEASE.jar ...
JarFileArchive内部的一些依赖jar对应的URL(SpringBoot使用org.springframework.boot.loader.jar.Handler处理器来处理这些URL):
1 jar:file:/Users/Format/Develop/gitrepository/springboot-analysis/springboot-executable-jar/target/executable-jar-1.0-SNAPSHOT.jar!/lib/spring-boot-starter-web-1.3.5.RELEASE.jar!/
1 jar:file:/Users/Format/Develop/gitrepository/springboot-analysis/springboot-executable-jar/target/executable-jar-1.0-SNAPSHOT.jar!/lib/spring-boot-loader-1.3.5.RELEASE.jar!/org/springframework/boot/loader/JarLauncher.class
我们看到如果有jar包中包含jar,或者jar包中包含jar包里面的class文件,那么会使用 !/ 分隔开,这种方式只有org.springframework.boot.loader.jar.Handler能处理,它是SpringBoot内部扩展出来的一种URL协议。
JarLauncher 从MANIFEST.MF可以看到Main函数是JarLauncher,下面来分析它的工作流程。JarLauncher类的继承结构是:
1
2
class JarLauncher extends ExecutableArchiveLauncher class ExecutableArchiveLauncher extends Launcher
Launcher for JAR based archives. This launcher assumes that dependency jars are included inside a /BOOT-INF/lib directory and that application classes are included inside a /BOOT-INF/classes directory.
按照定义,JarLauncher可以加载内部/BOOT-INF/lib下的jar及/BOOT-INF/classes下的应用class,其实JarLauncher实现很简单:
1
2
3
4
5
6
public class JarLauncher extends ExecutableArchiveLauncher { public JarLauncher() {} public static void main(String[] args) throws Exception { new JarLauncher().launch(args); } }
其主入口新建了JarLauncher并调用父类Launcher中的launch方法启动程序。在创建JarLauncher时,父类ExecutableArchiveLauncher找到自己所在的jar,并创建archive。
JarLauncher继承于org.springframework.boot.loader.ExecutableArchiveLauncher。该类的无参构造方法最主要的功能就是构建了当前main方法所在的FatJar的JarFileArchive对象。下面来看launch方法。该方法主要是做了2个事情:
(1)以FatJar为file作为入参,构造JarFileArchive对象。获取其中所有的资源目标,取得其Url,将这些URL作为参数,构建了一个URLClassLoader。
(2)以第一步构建的ClassLoader加载MANIFEST.MF文件中Start-Class指向的业务类,并且执行静态方法main。进而启动整个程序。
1
2
3
4
5
6
7
8
9
10
11
12
13
14
15
16
17
18
19
20
21
22
23
24
25
26
27
28
29
30
31
32
public abstract class ExecutableArchiveLauncher extends Launcher { private final Archive archive; public ExecutableArchiveLauncher() { try { // 找到自己所在的jar,并创建Archive this.archive = createArchive(); } catch (Exception ex) { throw new IllegalStateException(ex); } } } public abstract class Launcher { protected final Archive createArchive() throws Exception { ProtectionDomain protectionDomain = getClass().getProtectionDomain(); CodeSource codeSource = protectionDomain.getCodeSource(); URI location = (codeSource == null ? null : codeSource.getLocation().toURI()); String path = (location == null ? null : location.getSchemeSpecificPart()); if (path == null) { throw new IllegalStateException("Unable to determine code source archive"); } File root = new File(path); if (!root.exists()) { throw new IllegalStateException( "Unable to determine code source archive from " + root); } return (root.isDirectory() ? new ExplodedArchive(root) : new JarFileArchive(root)); } }
在Launcher的launch方法中,通过以上archive的getNestedArchives方法找到/BOOT-INF/lib下所有jar及/BOOT-INF/classes目录所对应的archive,通过这些archives的url生成LaunchedURLClassLoader,并将其设置为线程上下文类加载器,启动应用。
至此,才执行我们应用程序主入口类的main方法,所有应用程序类文件均可通过/BOOT-INF/classes加载,所有依赖的第三方jar均可通过/BOOT-INF/lib加载。
URLStreamHandler java中描述资源常使用URL。而URL有一个方法用于打开链接java.net.URL#openConnection()。由于URL用于表达各种各样的资源,打开资源的具体动作由java.net.URLStreamHandler这个类的子类来完成。根据不同的协议,会有不同的handler实现。而JDK内置了相当多的handler实现用于应对不同的协议。比如jar、file、http等等。URL内部有一个静态HashTable属性,用于保存已经被发现的协议和handler实例的映射。
获得URLStreamHandler有三种方法
(1)实现URLStreamHandlerFactory接口,通过方法URL.setURLStreamHandlerFactory设置。该属性是一个静态属性,且只能被设置一次。
(2)直接提供URLStreamHandler的子类,作为URL的构造方法的入参之一。但是在JVM中有固定的规范要求:
子类的类名必须是Handler,同时最后一级的包名必须是协议的名称。比如自定义了Http的协议实现,则类名必然为xx.http.Handler;
JVM启动的时候,需要设置java.protocol.handler.pkgs系统属性,如果有多个实现类,那么中间用|隔开。因为JVM在尝试寻找Handler时,会从这个属性中获取包名前缀,最终使用包名前缀.协议名.Handler,使用Class.forName方法尝试初始化类,如果初始化成功,则会使用该类的实现作为协议实现。
为了实现这个目标,SpringBoot首先从支持jar in jar中内容读取做了定制,也就是支持多个!/分隔符的url路径。SpringBoot定制了以下两个方面:
(1)实现了一个java.net.URLStreamHandler的子类org.springframework.boot.loader.jar.Handler。该Handler支持识别多个!/分隔符,并且正确的打开URLConnection。打开的Connection是SpringBoot定制的org.springframework.boot.loader.jar.JarURLConnection实现。
(2)实现了一个java.net.JarURLConnection的子类org.springframework.boot.loader.jar.JarURLConnection。该链接支持多个!/分隔符,并且自己实现了在这种情况下获取InputStream的方法。而为了能够在org.springframework.boot.loader.jar.JarURLConnection正确获取输入流,SpringBoot自定义了一套读取ZipFile的工具类和方法。这部分和ZIP压缩算法规范紧密相连,就不拓展了。
Jar应用启动流程总结 总结一下Spring Boot应用的启动流程:
(1)Spring Boot应用打包之后,生成一个Fat jar,包含了应用依赖的jar包和Spring Boot loader相关的类。
(2)Fat jar的启动Main函数是JarLauncher,它负责创建一个LaunchedURLClassLoader来加载/lib下面的jar,并以一个新线程启动应用的Main函数。
那么,ClassLoader是如何读取到Resource,它又需要哪些能力?查找资源和读取资源的能力。对应的API:
1
2
public URL findResource(String name) public InputStream getResourceAsStream(String name)
SpringBoot构造LaunchedURLClassLoader时,传递了一个URL[]数组。数组里是lib目录下面的jar的URL。
对于一个URL,JDK或者ClassLoader如何知道怎么读取到里面的内容的?流程如下:
LaunchedURLClassLoader.loadClass
URL.getContent()
URL.openConnection()
Handler.openConnection(URL)
最终调用的是JarURLConnection的getInputStream()函数。
1
2
3
4
5
6
7
8
9
//org.springframework.boot.loader.jar.JarURLConnection @Override public InputStream getInputStream() throws IOException { connect(); if (this.jarEntryName.isEmpty()) { throw new IOException("no entry name specified"); } return this.jarEntryData.getInputStream(); }
从一个URL,到最终读取到URL里的内容,整个过程是比较复杂的,总结下:
Spring boot注册了一个Handler来处理”jar:”这种协议的URL。
Spring boot扩展了JarFile和JarURLConnection,内部处理jar in jar的情况。
在处理多重jar in jar的URL时,Spring Boot会循环处理,并缓存已经加载到的JarFile。
对于多重jar in jar,实际上是解压到了临时目录来处理,可以参考JarFileArchive里的代码。
在获取URL的InputStream时,最终获取到的是JarFile里的JarEntryData。
细节很多,上面只列出比较重要的步骤。最后,URLClassLoader是如何getResource的呢?URLClassLoader在构造时,有URL[]数组参数,它内部会用这个数组来构造一个URLClassPath:
URLClassPath ucp = new URLClassPath(urls);
在URLClassPath内部会为这些URLS都构造一个Loader,然后在getResource时,会从这些Loader里一个个去尝试获取。如果获取成功的话,就像下面那样包装为一个Resource。
1
2
3
4
5
6
7
8
9
10
11
12
13
14
15
16
17
18
19
20
21
22
23
24
25
26
27
28
29
30
31
32
33
34
35
36
37
Resource getResource(final String name, boolean check) { final URL url; try { url = new URL(base, ParseUtil.encodePath(name, false)); } catch (MalformedURLException e) { throw new IllegalArgumentException("name"); } final URLConnection uc; try { if (check) { URLClassPath.check(url); } uc = url.openConnection(); InputStream in = uc.getInputStream(); if (uc instanceof JarURLConnection) { /* Need to remember the jar file so it can be closed * in a hurry. */ JarURLConnection juc = (JarURLConnection)uc; jarfile = JarLoader.checkJar(juc.getJarFile()); } } catch (Exception e) { return null; } return new Resource() { public String getName() { return name; } public URL getURL() { return url; } public URL getCodeSourceURL() { return base; } public InputStream getInputStream() throws IOException { return uc.getInputStream(); } public int getContentLength() throws IOException { return uc.getContentLength(); } }; } JarURLConnection juc = (JarURLConnection)uc;
从代码里可以看到,实际上是调用了url.openConnection()。这样完整的链条就可以连接起来了。
总结 JarLauncher通过加载BOOT-INF/classes目录及BOOT-INF/lib目录下jar文件,实现了fat jar的启动。
SpringBoot通过扩展JarFile、JarURLConnection及URLStreamHandler,实现了jar in jar中资源的加载。
SpringBoot通过扩展URLClassLoader–LauncherURLClassLoader,实现了jar in jar中class文件的加载。
WarLauncher通过加载WEB-INF/classes目录及WEB-INF/lib和WEB-INF/lib-provided目录下的jar文件,实现了war文件的直接启动及web容器中的启动。
springboot启动源码分析 springboot 启动脑图 https://www.processon.com/view/link/60d865e85653bb049a4b77ff#map
入口类 1 2 3 4 5 6 7 8 9 10 11 12 13 package com.example.demo;import org.springframework.boot.SpringApplication;import org.springframework.boot.autoconfigure.SpringBootApplication;@SpringBootApplication public class DemoApplication public static void main (String[] args) SpringApplication.run(DemoApplication.class, args); } }
上的代码就是通过Spring Initializr配置生成的一个最简单的Web项目(只引入了Web功能)的入口方法。这个想必只要是接触过Spring Boot都会很熟悉。简单的方法背后掩藏的是Spring Boot在启动过程中的复杂性,本文的目的就是一探这里面的究竟。
注解@SpringBootApplication 在看这个方法的实现之前,需要看看@SpringBootApplication这个注解的功能:
1 2 3 4 5 6 7 8 9 10 11 12 13 14 15 16 17 18 @Target({ElementType.TYPE}) @Retention(RetentionPolicy.RUNTIME) @Documented @Inherited @SpringBootConfiguration @EnableAutoConfiguration @ComponentScan( excludeFilters = {@Filter( type = FilterType.CUSTOM, classes = {TypeExcludeFilter.class} ), @Filter( type = FilterType.CUSTOM, classes = {AutoConfigurationExcludeFilter.class} )} ) public @interface SpringBootApplication { }
明显的,这个注解就是三个常用在一起的注解@SpringBootConfiguration,@EnableAutoConfiguration以及@ComponentScan的组合,并没有什么高深的地方。
@SpringBootConfiguration 1 2 3 4 5 6 @Target({ElementType.TYPE}) @Retention(RetentionPolicy.RUNTIME) @Documented @Configuration public @interface SpringBootConfiguration {}
这个注解实际上和@Configuration有相同的作用,配备了该注解的类就能够以JavaConfig的方式完成一些配置,可以不再使用XML配置。
@ComponentScan 顾名思义,这个注解完成的是自动扫描的功能,相当于Spring XML配置文件中的:
1 <context:component-scan>
可以使用basePackages属性指定要扫描的包,以及扫描的条件。如果不设置的话默认扫描@ComponentScan注解所在类的同级类和同级目录下的所有类,所以对于一个Spring Boot项目,一般会把入口类放在顶层目录中,这样就能够保证源码目录下的所有类都能够被扫描到。
@EnableAutoConfiguration 1 2 3 4 5 6 7 8 9 10 11 12 13 @Target({ElementType.TYPE}) @Retention(RetentionPolicy.RUNTIME) @Documented @Inherited @AutoConfigurationPackage @Import({EnableAutoConfigurationImportSelector.class}) public @interface EnableAutoConfiguration { String ENABLED_OVERRIDE_PROPERTY = "spring.boot.enableautoconfiguration" ; Class<?>[] exclude() default {}; String[] excludeName() default {}; }
这个注解是让Spring Boot的配置能够如此简化的关键性注解。目前知道这个注解的作用就可以了,关于自动配置不再本文讨论范围内,后面如果有机会另起文章专门分析这个自动配置的实现原理。
入口方法 SpringApplication的实例化 介绍完了入口类,下面开始分析关键方法:
1 SpringApplication.run(DemoApplication.class, args);
对应实现:
1 2 3 4 5 6 7 8 9 10 11 public static ConfigurableApplicationContext run (Class<?> primarySource, String... args) return run(new Class<?>[] { primarySource }, args); } public static ConfigurableApplicationContext run (Class<?>[] primarySources, String[] args) return new SpringApplication(primarySources).run(args); }
实际上会构造一个SpringApplication的实例,然后运行它的run方法:
创建SpringApplication 1 2 3 4 5 6 7 8 9 10 11 12 13 14 15 16 17 18 19 20 public SpringApplication (ResourceLoader resourceLoader, Class<?>... primarySources) this .resourceLoader = resourceLoader; Assert.notNull(primarySources, "PrimarySources must not be null" ); this .primarySources = new LinkedHashSet<>(Arrays.asList(primarySources)); this .webApplicationType = deduceWebApplicationType(); setInitializers((Collection) getSpringFactoriesInstances(ApplicationContextInitializer.class)); setListeners((Collection) getSpringFactoriesInstances(ApplicationListener.class)); setInitializers((Collection) getSpringFactoriesInstances( ApplicationContextInitializer.class)); setListeners((Collection) getSpringFactoriesInstances(ApplicationListener.class)); this .mainApplicationClass = deduceMainApplicationClass(); }
在构造函数中,主要做了4件事情:
推断应用类型是Standard还是Web 1 2 3 4 5 6 7 8 9 10 11 12 13 14 15 16 17 18 19 20 private WebApplicationType deduceWebApplicationType () if (ClassUtils.isPresent(REACTIVE_WEB_ENVIRONMENT_CLASS, null ) && !ClassUtils.isPresent(MVC_WEB_ENVIRONMENT_CLASS, null )) { return WebApplicationType.REACTIVE; } for (String className : WEB_ENVIRONMENT_CLASSES) { if (!ClassUtils.isPresent(className, null )) { return WebApplicationType.NONE; } } return WebApplicationType.SERVLET; } private static final String REACTIVE_WEB_ENVIRONMENT_CLASS = "org.springframework." + "web.reactive.DispatcherHandler" ; private static final String MVC_WEB_ENVIRONMENT_CLASS = "org.springframework." + "web.servlet.DispatcherServlet" ; private static final String[] WEB_ENVIRONMENT_CLASSES = { "javax.servlet.Servlet" , "org.springframework.web.context.ConfigurableWebApplicationContext" };
可能会出现三种结果:
WebApplicationType.REACTIVE - 当类路径中存在REACTIVE_WEB_ENVIRONMENT_CLASS并且不存在MVC_WEB_ENVIRONMENT_CLASS时
WebApplicationType.NONE - 也就是非Web型应用(Standard型),此时类路径中不包含WEB_ENVIRONMENT_CLASSES中定义的任何一个类时
WebApplicationType.SERVLET - 类路径中包含了WEB_ENVIRONMENT_CLASSES中定义的所有类型时
设置初始化器(Initializer) 1 2 setInitializers((Collection) getSpringFactoriesInstances( ApplicationContextInitializer.class));
这里出现了一个新的概念 - 初始化器。
先来看看代码,再来尝试解释一下它是干嘛的:
1 2 3 4 5 6 7 8 9 10 11 12 13 14 15 16 17 18 private <T> Collection<T> getSpringFactoriesInstances (Class<T> type) { return getSpringFactoriesInstances(type, new Class<?>[] {}); } private <T> Collection<T> getSpringFactoriesInstances (Class<T> type, Class<?>[] parameterTypes, Object... args) ClassLoader classLoader = Thread.currentThread().getContextClassLoader(); Set<String> names = new LinkedHashSet<>( SpringFactoriesLoader.loadFactoryNames(type, classLoader)); List<T> instances = createSpringFactoriesInstances(type, parameterTypes, classLoader, args, names); AnnotationAwareOrderComparator.sort(instances); return instances; }
这里面首先会根据入参type读取所有的names(是一个String集合),然后根据这个集合来完成对应的实例化操作:
1 2 3 4 5 6 7 8 9 10 11 12 13 14 15 16 17 18 19 20 public static List<String> loadFactoryNames (Class<?> factoryClass, ClassLoader classLoader) String factoryClassName = factoryClass.getName(); try { Enumeration<URL> urls = classLoader != null ?classLoader.getResources("META-INF/spring.factories" ):ClassLoader.getSystemResources("META-INF/spring.factories" ); ArrayList result = new ArrayList(); while (urls.hasMoreElements()) { URL url = (URL)urls.nextElement(); Properties properties = PropertiesLoaderUtils.loadProperties(new UrlResource(url)); String factoryClassNames = properties.getProperty(factoryClassName); result.addAll(Arrays.asList(StringUtils.commaDelimitedListToStringArray(factoryClassNames))); } return result; } catch (IOException var8) { throw new IllegalArgumentException("Unable to load [" + factoryClass.getName() + "] factories from location [" + "META-INF/spring.factories" + "]" , var8); } }
这个方法会尝试从类路径的META-INF/spring.factories处读取相应配置文件,然后进行遍历,读取配置文件中Key为:org.springframework.context.ApplicationContextInitializer的value。以spring-boot-autoconfigure这个包为例,它的META-INF/spring.factories部分定义如下所示:
1 2 3 4 # Initializers org.springframework.context.ApplicationContextInitializer=\ org.springframework.boot.autoconfigure.SharedMetadataReaderFactoryContextInitializer,\ org.springframework.boot.autoconfigure.logging.AutoConfigurationReportLoggingInitializer
因此这两个类名会被读取出来,然后放入到集合中,准备开始下面的实例化操作:
1 2 3 4 5 6 7 8 9 10 11 12 13 14 15 16 17 18 19 20 21 22 23 private <T> List<T> createSpringFactoriesInstances (Class<T> type, Class<?>[] parameterTypes, ClassLoader classLoader, Object[] args, Set<String> names) List<T> instances = new ArrayList<T>(names.size()); for (String name : names) { try { Class<?> instanceClass = ClassUtils.forName(name, classLoader); Assert.isAssignable(type, instanceClass); Constructor<?> constructor = instanceClass .getDeclaredConstructor(parameterTypes); T instance = (T) BeanUtils.instantiateClass(constructor, args); instances.add(instance); } catch (Throwable ex) { throw new IllegalArgumentException( "Cannot instantiate " + type + " : " + name, ex); } } return instances; }
初始化步骤很直观,没什么好说的,类加载,确认被加载的类确实是org.springframework.context.ApplicationContextInitializer的子类,然后就是得到构造器进行初始化,最后放入到实例列表中。
因此,所谓的初始化器就是org.springframework.context.ApplicationContextInitializer的实现类,这个接口是这样定义的:
1 2 3 4 5 6 7 8 9 public interface ApplicationContextInitializer <C extends ConfigurableApplicationContext > void initialize (C applicationContext) }
根据类文档,这个接口的主要功能是:
在Spring上下文被刷新之前进行初始化的操作。典型地比如在Web应用中,注册Property Sources或者是激活Profiles。Property Sources比较好理解,就是配置文件。Profiles是Spring为了在不同环境下(如DEV,TEST,PRODUCTION等),加载不同的配置项而抽象出来的一个实体。
设置监听器(Listener) 设置完了初始化器,下面开始设置监听器:
1 setListeners((Collection) getSpringFactoriesInstances(ApplicationListener.class));
同样地,监听器也是一个新概念,还是从代码入手:
1 2 3 4 5 6 7 8 9 10 11 12 13 14 15 16 private <T> Collection<? extends T> getSpringFactoriesInstances(Class<T> type) { return getSpringFactoriesInstances(type, new Class<?>[] {}); } private <T> Collection<? extends T> getSpringFactoriesInstances(Class<T> type, Class<?>[] parameterTypes, Object... args) { ClassLoader classLoader = Thread.currentThread().getContextClassLoader(); Set<String> names = new LinkedHashSet<String>( SpringFactoriesLoader.loadFactoryNames(type, classLoader)); List<T> instances = createSpringFactoriesInstances(type, parameterTypes, classLoader, args, names); AnnotationAwareOrderComparator.sort(instances); return instances; }
可以发现,这个加载相应的类名,然后完成实例化的过程和上面在设置初始化器时如出一辙,同样,还是以spring-boot-autoconfigure这个包中的spring.factories为例,看看相应的Key-Value:
1 2 3 # Application Listeners org.springframework.context.ApplicationListener=\ org.springframework.boot.autoconfigure.BackgroundPreinitializer
至于ApplicationListener接口,它是Spring框架中一个相当基础的接口了,代码如下:
1 2 3 4 5 6 7 8 9 10 @FunctionalInterface public interface ApplicationListener <E extends ApplicationEvent > extends EventListener void onApplicationEvent (E event) }
这个接口基于JDK中的EventListener接口,实现了观察者模式。对于Spring框架的观察者模式实现,它限定感兴趣的事件类型需要是ApplicationEvent类型的子类,而这个类同样是继承自JDK中的EventObject类。
推断应用入口类 1 this .mainApplicationClass = deduceMainApplicationClass();
这个方法的实现有点意思:
1 2 3 4 5 6 7 8 9 10 11 12 13 14 private Class<?> deduceMainApplicationClass() { try { StackTraceElement[] stackTrace = new RuntimeException().getStackTrace(); for (StackTraceElement stackTraceElement : stackTrace) { if ("main" .equals(stackTraceElement.getMethodName())) { return Class.forName(stackTraceElement.getClassName()); } } } catch (ClassNotFoundException ex) { } return null ; }
它通过构造一个运行时异常,通过异常栈中方法名为main的栈帧来得到入口类的名字。
至此,对于SpringApplication实例的初始化过程就结束了。
总结:
获取启动类:根据启动类加载ioc容器
获取web应用类型
spring.factories读取了对外扩展的ApplicationContextInitializer ,ApplicationListener 对外扩展, 对类解耦(比如全局配置文件、热部署插件)
根据main推算出所在的类
启动 run 完成了实例化,下面开始调用run方法:
1 2 3 4 5 6 7 8 9 10 11 12 13 14 15 16 17 18 19 20 21 22 23 24 25 26 27 28 29 30 31 32 33 34 35 36 37 38 39 40 41 42 43 44 45 46 47 48 49 50 51 52 53 54 55 56 57 58 59 60 61 62 63 64 65 66 67 68 69 70 public ConfigurableApplicationContext run (String... args) StopWatch stopWatch = new StopWatch(); stopWatch.start(); ConfigurableApplicationContext context = null ; Collection<SpringBootExceptionReporter> exceptionReporters = new ArrayList<>(); configureHeadlessProperty(); SpringApplicationRunListeners listeners = getRunListeners(args); listeners.starting(); try { ApplicationArguments applicationArguments = new DefaultApplicationArguments( args); ConfigurableEnvironment environment = prepareEnvironment(listeners, applicationArguments); configureIgnoreBeanInfo(environment); Banner printedBanner = printBanner(environment); context = createApplicationContext(); exceptionReporters = getSpringFactoriesInstances( SpringBootExceptionReporter.class, new Class[] { ConfigurableApplicationContext.class }, context); prepareContext(context, environment, listeners, applicationArguments, printedBanner); refreshContext(context); afterRefresh(context, applicationArguments); listeners.finished(context, null ); stopWatch.stop(); if (this .logStartupInfo) { new StartupInfoLogger(this .mainApplicationClass) .logStarted(getApplicationLog(), stopWatch); } return context; } catch (Throwable ex) { handleRunFailure(context, listeners, exceptionReporters, ex); throw new IllegalStateException(ex); } }
这个run方法包含的内容也是有点多的,根据上面列举出的关键步骤逐个进行分析:
getRunListeners: 1 2 3 4 5 private SpringApplicationRunListeners getRunListeners (String[] args) Class<?>[] types = new Class<?>[] { SpringApplication.class, String[].class }; return new SpringApplicationRunListeners(logger, getSpringFactoriesInstances( SpringApplicationRunListener.class, types, this , args)); }
这里仍然利用了getSpringFactoriesInstances方法来获取实例:
1 2 3 4 5 6 7 8 9 10 11 12 13 14 15 private <T> Collection<? extends T> getSpringFactoriesInstances(Class<T> type, Class<?>[] parameterTypes, Object... args) { ClassLoader classLoader = Thread.currentThread().getContextClassLoader(); Set<String> names = new LinkedHashSet<String>( SpringFactoriesLoader.loadFactoryNames(type, classLoader)); List<T> instances = createSpringFactoriesInstances(type, parameterTypes, classLoader, args, names); AnnotationAwareOrderComparator.sort(instances); return instances; }
所以这里还是故技重施,从META-INF/spring.factories中读取Key为org.springframework.boot.SpringApplicationRunListener的Values:
比如在spring-boot包中的定义的spring.factories:
1 2 3 # Run Listeners org.springframework.boot.SpringApplicationRunListener=\ org.springframework.boot.context.event.EventPublishingRunListener
我们来看看这个EventPublishingRunListener是干嘛的:
1 2 3 4 5 6 7 8 9 10 11 12 /** * {@link SpringApplicationRunListener} to publish {@link SpringApplicationEvent}s. * <p> * Uses an internal {@link ApplicationEventMulticaster} for the events that are fired * before the context is actually refreshed. * * @author Phillip Webb * @author Stephane Nicoll */ public class EventPublishingRunListener implements SpringApplicationRunListener, Ordered { // ... }
从类文档可以看出,它主要是负责发布SpringApplicationEvent事件的,它会利用一个内部的ApplicationEventMulticaster在上下文实际被刷新之前对事件进行处理。至于具体的应用场景,后面用到的时候再来分析。
prepareEnvironment 1 2 3 4 5 6 7 8 9 10 11 12 13 14 15 16 17 18 19 20 private ConfigurableEnvironment prepareEnvironment (SpringApplicationRunListeners listeners, ApplicationArguments applicationArguments) ConfigurableEnvironment environment = getOrCreateEnvironment(); configureEnvironment(environment, applicationArguments.getSourceArgs()); ConfigurationPropertySources.attach(environment); listeners.environmentPrepared(environment); bindToSpringApplication(environment); if (!this .isCustomEnvironment) { environment = new EnvironmentConverter(getClassLoader()).convertEnvironmentIfNecessary(environment, deduceEnvironmentClass()); } ConfigurationPropertySources.attach(environment); return environment; }
配置环境的方法:
1 2 3 4 5 protected void configureEnvironment (ConfigurableEnvironment environment, String[] args) configurePropertySources(environment, args); configureProfiles(environment, args); }
所以这里实际上也包含了两个步骤:
配置Property Sources
配置Profiles
具体实现这里就不展开了,代码也比较直观。
对于Web应用而言,得到的environment变量是一个StandardServletEnvironment的实例。得到实例后,会调用前面RunListeners中的environmentPrepared方法:
1 2 3 4 5 @Override public void environmentPrepared (ConfigurableEnvironment environment) this .initialMulticaster.multicastEvent(new ApplicationEnvironmentPreparedEvent( this .application, this .args, environment)); }
在这里,定义的广播器就派上用场了,它会发布一个ApplicationEnvironmentPreparedEvent事件。
那么有发布就有监听,在构建SpringApplication实例的时候不是初始化过一些ApplicationListeners嘛,其中的Listener就可能会监听ApplicationEnvironmentPreparedEvent事件,然后进行相应处理。
所以这里SpringApplicationRunListeners的用途和目的也比较明显了,它实际上是一个事件中转器,它能够感知到Spring Boot启动过程中产生的事件,然后有选择性的将事件进行中转。为何是有选择性的,看看它的实现就知道了:
1 2 3 4 @Override public void contextPrepared (ConfigurableApplicationContext context) }
它的contextPrepared方法实现为空,没有利用内部的initialMulticaster进行事件的派发。因此即便是外部有ApplicationListener对这个事件有兴趣,也是没有办法监听到的。
那么既然有事件的转发,是谁在监听这些事件呢,在这个类的构造器中交待了:
1 2 3 4 5 6 7 8 public EventPublishingRunListener (SpringApplication application, String[] args) this .application = application; this .args = args; this .initialMulticaster = new SimpleApplicationEventMulticaster(); for (ApplicationListener<?> listener : application.getListeners()) { this .initialMulticaster.addApplicationListener(listener); } }
前面在构建SpringApplication实例过程中设置的监听器在这里被逐个添加到了initialMulticaster对应的ApplicationListener列表中。所以当initialMulticaster调用multicastEvent方法时,这些Listeners中定义的相应方法就会被触发了。
createApplicationContext 1 2 3 4 5 6 7 8 9 10 11 12 13 14 15 16 17 18 19 protected ConfigurableApplicationContext createApplicationContext () Class<?> contextClass = this .applicationContextClass; if (contextClass == null ) { try { contextClass = Class.forName(this .webEnvironment ? DEFAULT_WEB_CONTEXT_CLASS : DEFAULT_CONTEXT_CLASS); } catch (ClassNotFoundException ex) { throw new IllegalStateException( "Unable create a default ApplicationContext, " + "please specify an ApplicationContextClass" , ex); } } return (ConfigurableApplicationContext) BeanUtils.instantiate(contextClass); } public static final String DEFAULT_WEB_CONTEXT_CLASS = "org.springframework.boot.context.embedded.AnnotationConfigEmbeddedWebApplicationContext" ;
对于我们的Web应用,上下文类型就是DEFAULT_WEB_CONTEXT_CLASS。
prepareContext 1 2 3 4 5 6 7 8 9 10 11 12 13 14 15 16 17 18 19 20 21 22 23 24 25 26 27 28 29 30 31 32 33 34 35 36 private void prepareContext (ConfigurableApplicationContext context, ConfigurableEnvironment environment, SpringApplicationRunListeners listeners, ApplicationArguments applicationArguments, Banner printedBanner) context.setEnvironment(environment); postProcessApplicationContext(context); applyInitializers(context); listeners.contextPrepared(context); if (this .logStartupInfo) { logStartupInfo(context.getParent() == null ); logStartupProfileInfo(context); } ConfigurableListableBeanFactory beanFactory = context.getBeanFactory(); beanFactory.registerSingleton("springApplicationArguments" , applicationArguments); if (printedBanner != null ) { beanFactory.registerSingleton("springBootBanner" , printedBanner); } if (beanFactory instanceof DefaultListableBeanFactory) { ((DefaultListableBeanFactory) beanFactory) .setAllowBeanDefinitionOverriding(this .allowBeanDefinitionOverriding); } if (this .lazyInitialization) { context.addBeanFactoryPostProcessor(new LazyInitializationBeanFactoryPostProcessor()); } Set<Object> sources = getAllSources(); Assert.notEmpty(sources, "Sources must not be empty" ); load(context, sources.toArray(new Object[0 ])); listeners.contextLoaded(context); }
关键步骤:
配置Bean生成器以及资源加载器(如果它们非空):
1 2 3 4 5 6 7 8 9 10 11 12 13 14 15 16 17 protected void postProcessApplicationContext (ConfigurableApplicationContext context) if (this .beanNameGenerator != null ) { context.getBeanFactory().registerSingleton( AnnotationConfigUtils.CONFIGURATION_BEAN_NAME_GENERATOR, this .beanNameGenerator); } if (this .resourceLoader != null ) { if (context instanceof GenericApplicationContext) { ((GenericApplicationContext) context) .setResourceLoader(this .resourceLoader); } if (context instanceof DefaultResourceLoader) { ((DefaultResourceLoader) context) .setClassLoader(this .resourceLoader.getClassLoader()); } } }
调用初始化器
1 2 3 4 5 6 7 8 protected void applyInitializers (ConfigurableApplicationContext context) for (ApplicationContextInitializer initializer : getInitializers()) { Class<?> requiredType = GenericTypeResolver.resolveTypeArgument( initializer.getClass(), ApplicationContextInitializer.class); Assert.isInstanceOf(requiredType, context, "Unable to call initializer." ); initializer.initialize(context); } }
这里终于用到了在创建SpringApplication实例时设置的初始化器了,依次对它们进行遍历,并调用initialize方法。
refreshContext 1 2 3 4 5 6 7 8 9 10 11 12 13 14 15 16 17 18 19 20 private void refreshContext (ConfigurableApplicationContext context) refresh(context); if (this .registerShutdownHook) { try { context.registerShutdownHook(); } catch (AccessControlException ex) { } } } protected void refresh (ApplicationContext applicationContext) Assert.isInstanceOf(AbstractApplicationContext.class, applicationContext); ((AbstractApplicationContext)applicationContext).refresh(); }
注册关闭容器时的钩子函数的默认实现是在AbstractApplicationContext类中:
1 2 3 4 5 6 7 8 9 10 11 12 public void registerShutdownHook () if (this .shutdownHook == null ) { this .shutdownHook = new Thread() { public void run () synchronized (AbstractApplicationContext.this .startupShutdownMonitor) { AbstractApplicationContext.this .doClose(); } } }; Runtime.getRuntime().addShutdownHook(this .shutdownHook); } }
如果没有提供自定义的shutdownHook,那么会生成一个默认的,并添加到Runtime中。默认行为就是调用它的doClose方法,完成一些容器销毁时的清理工作。
afterRefresh 1 2 3 4 5 6 7 8 9 10 11 12 13 14 15 16 17 18 19 20 21 22 23 24 25 26 27 28 29 30 31 32 33 34 35 36 37 protected void afterRefresh (ConfigurableApplicationContext context, ApplicationArguments args) callRunners(context, args); } private void callRunners (ApplicationContext context, ApplicationArguments args) List<Object> runners = new ArrayList<Object>(); runners.addAll(context.getBeansOfType(ApplicationRunner.class).values()); runners.addAll(context.getBeansOfType(CommandLineRunner.class).values()); AnnotationAwareOrderComparator.sort(runners); for (Object runner : new LinkedHashSet<Object>(runners)) { if (runner instanceof ApplicationRunner) { callRunner((ApplicationRunner) runner, args); } if (runner instanceof CommandLineRunner) { callRunner((CommandLineRunner) runner, args); } } } private void callRunner (ApplicationRunner runner, ApplicationArguments args) try { (runner).run(args); } catch (Exception ex) { throw new IllegalStateException("Failed to execute ApplicationRunner" , ex); } } private void callRunner (CommandLineRunner runner, ApplicationArguments args) try { (runner).run(args.getSourceArgs()); } catch (Exception ex) { throw new IllegalStateException("Failed to execute CommandLineRunner" , ex); } }
所谓的后置操作,就是在容器完成刷新后,依次调用注册的Runners。Runners可以是两个接口的实现类:
1 2 org.springframework.boot.ApplicationRunner org.springframework.boot.CommandLineRunner
这两个接口有什么区别呢:
1 2 3 4 5 6 7 8 public interface ApplicationRunner public interface CommandLineRunner void run (String... args) throws Exception }
其实没有什么不同之处,除了接口中的run方法接受的参数类型是不一样的以外。一个是封装好的ApplicationArguments类型,另一个是直接的String不定长数组类型。因此根据需要选择相应的接口实现即可。
至此,SpringApplication的run方法就分析完毕了。
总结
初始化SpringApplication 从spring.factories 读取 listener ApplicationContextInitializer 。
运行run方法
读取 环境变量 配置信息…..
创建springApplication上下文:ServletWebServerApplicationContext
预初始化上下文 : 读取启动类
调用refresh 加载ioc容器
加载所有的自动配置类
创建servlet容器
ps.在这个过程中springboot会调用很多监听器对外进行扩展
使用外部Servlet容器
外部servlet容器
服务器、本机 安装tomcat 环境变量…
部署: war—运维—>tomcat webapp startup.sh 启动
开发: 将开发绑定本地tomcat
开发 、 运维 服务器配置 war
内嵌servlet容器:
部署: jar—> 运维—java -jar 启动
使用:
下载tomcat服务
设置当前maven项目的打包方式
1 2 <!--打包方式 默认是jar--> <packaging>war</packaging>
让tomcat相关的依赖不参与打包部署 ,因为外置tomcat服务器已经有这些jar包
1 2 3 4 5 6 <!--让它不参与打包部署--> <dependency> <artifactId>spring-boot-starter-tomcat</artifactId> <groupId>org.springframework.boot</groupId> <scope>provided</scope> </dependency>
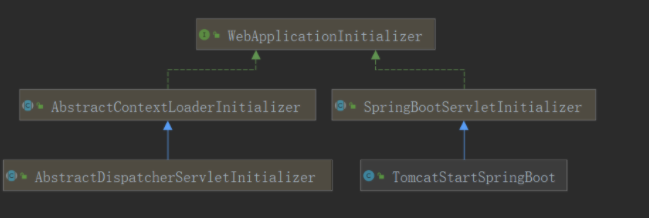
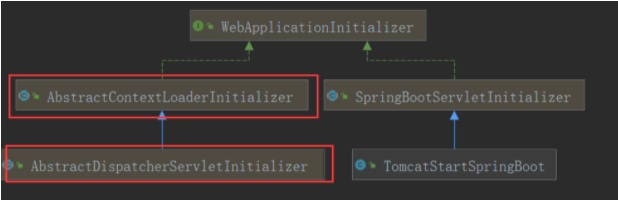
为了让它支持springboot需要加上: 才能启动springboot应用
1 2 3 4 5 6 public class TomcatStartSpringBoot extends SpringBootServletInitializer { @Override protected SpringApplicationBuilder configure(SpringApplicationBuilder builder) { return builder.sources(Application.class); } }
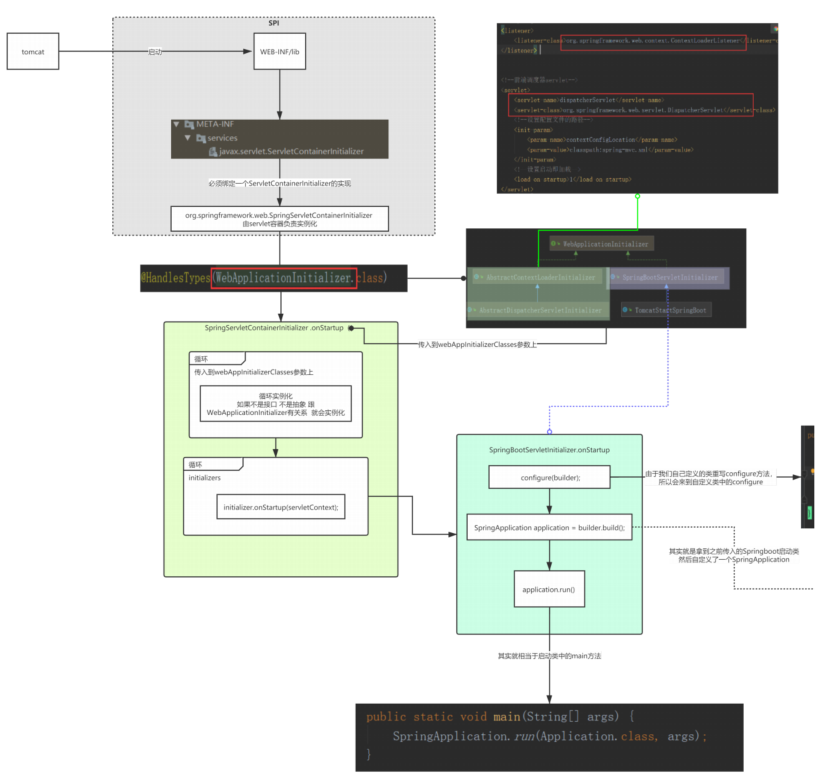
外部Servlet容器启动SpringBoot应用原理 tomcat不会主动去启动springboot应用 ,, 所以tomcat启动的时候肯定调用了SpringBootServletInitializer的SpringApplicationBuilder , 就会启动springboot
1 2 3 4 5 6 public class TomcatStartSpringBoot extends SpringBootServletInitializer { @Override protected SpringApplicationBuilder (SpringApplicationBuilder builder) { return builder.sources(Application.class); } }
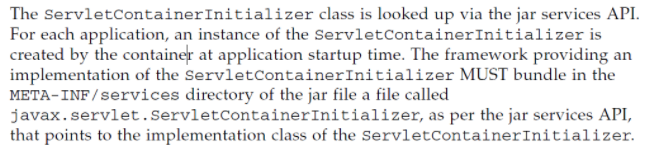
servlet3.0 规范官方文档: 8.2.4
什么是SPI
SPI ,全称为 Service Provider Interface(服务提供者接口),是一种服务发现机制。它通过在ClassPath路径下的META-INF/services文件夹查找文件,自动加载文件里所定义的类。
大概: 当servlet容器启动时候 就会去META-INF/services 文件夹中找到javax.servlet.ServletContainerInitializer, 这个文件里面肯定绑定一个ServletContainerInitializer. 当servlet容器启动时候就会去该文件中找到ServletContainerInitializer的实现类,从而创建它的实例调用onstartUp
1 2 @HandlesTypes(WebApplicationInitializer.class) public class SpringServletContainerInitializer implements ServletContainerInitializer {
1 2 3 4 5 6 7 8 9 10 11 12 13 14 15 16 17 18 19 20 21 22 23 24 25 26 27 28 29 30 31 32 33 34 @Override public void onStartup(@Nullable Set<Class<?>> webAppInitializerClasses, ServletContext servletContext) throws ServletException { List<WebApplicationInitializer> initializers = new LinkedList<>(); if (webAppInitializerClasses != null) { for (Class<?> waiClass : webAppInitializerClasses) { // 如果不是接口 不是抽象 跟WebApplicationInitializer有关系 就会实例化 if (!waiClass.isInterface() && !Modifier.isAbstract(waiClass.getModifiers()) && WebApplicationInitializer.class.isAssignableFrom(waiClass)) { try { initializers.add((WebApplicationInitializer) ReflectionUtils.accessibleConstructor(waiClass).newInstance()); } catch (Throwable ex) { throw new ServletException("Failed to instantiate WebApplicationInitializer class", ex); } } } } if (initializers.isEmpty()) { servletContext.log("No Spring WebApplicationInitializer types detected on classpath"); return; } servletContext.log(initializers.size() + " Spring WebApplicationInitializers detected on classpath"); // 排序 AnnotationAwareOrderComparator.sort(initializers); for (WebApplicationInitializer initializer : initializers) { initializer.onStartup(servletContext); } }
1 2 3 4 5 6 7 8 9 10 11 12 13 14 @Override public void onStartup(ServletContext servletContext) throws ServletException { // Logger initialization is deferred in case an ordered // LogServletContextInitializer is being used this.logger = LogFactory.getLog(getClass()); WebApplicationContext rootApplicationContext = createRootApplicationContext(servletContext); if (rootApplicationContext != null) { servletContext.addListener(new SpringBootContextLoaderListener(rootApplicationContext, servletContext)); } else { this.logger.debug("No ContextLoaderListener registered, as createRootApplicationContext() did not " + "return an application context"); } }
1 2 3 4 5 6 7 8 9 10 11 12 13 14 15 16 17 18 19 20 21 22 23 24 25 26 27 28 29 protected WebApplicationContext createRootApplicationContext(ServletContext servletContext) { SpringApplicationBuilder builder = createSpringApplicationBuilder(); builder.main(getClass()); ApplicationContext parent = getExistingRootWebApplicationContext(servletContext); if (parent != null) { this.logger.info("Root context already created (using as parent)."); servletContext.setAttribute(WebApplicationContext.ROOT_WEB_APPLICATION_CONTEXT_ATTRIBUTE, null); builder.initializers(new ParentContextApplicationContextInitializer(parent)); } builder.initializers(new ServletContextApplicationContextInitializer(servletContext)); builder.contextClass(AnnotationConfigServletWebServerApplicationContext.class); // 调用configure builder = configure(builder); builder.listeners(new WebEnvironmentPropertySourceInitializer(servletContext)); SpringApplication application = builder.build(); if (application.getAllSources().isEmpty() && MergedAnnotations.from(getClass(), SearchStrategy.TYPE_HIERARCHY).isPresent(Configuration.class)) { application.addPrimarySources(Collections.singleton(getClass())); } Assert.state(!application.getAllSources().isEmpty(), "No SpringApplication sources have been defined. Either override the " + "configure method or add an @Configuration annotation"); // Ensure error pages are registered if (this.registerErrorPageFilter) { application.addPrimarySources(Collections.singleton(ErrorPageFilterConfiguration.class)); } application.setRegisterShutdownHook(false); return run(application); }
1 2 3 4 @Override protected SpringApplicationBuilder configure(SpringApplicationBuilder builder) { return builder.sources(Application.class); }
// 调用SpringApplication application = builder.build(); 就会根据传入的Springboot启动类来构建一个SpringApplication
1 2 3 4 5 public SpringApplication build(String... args) { configureAsChildIfNecessary(args); this.application.addPrimarySources(this.sources); return this.application; }
// 调用 return run(application); 就会帮我启动springboot应用
1 2 3 protected WebApplicationContext run(SpringApplication application) { return (WebApplicationContext) application.run(); }
它就相当于我们的
1 2 3 public static void main(String[] args) { SpringApplication.run(Application.class, args); }
其实这2个实现类就是帮我创建ContextLoaderListener 和DispatcherServlet
1 2 3 4 5 6 7 8 9 10 11 12 13 14 15 16 17 18 19 20 21 22 23 24 25 26 <listener> <listener-class>org.springframework.web.context.ContextLoaderListener</listener-class> </listener> <!--全局参数:spring配置文件--> <context-param> <param-name>contextConfigLocation</param-name> <param-value>classpath:spring-core.xml</param-value> </context-param> <!--前端调度器servlet--> <servlet> <servlet-name>dispatcherServlet</servlet-name> <servlet-class>org.springframework.web.servlet.DispatcherServlet</servlet-class> <!--设置配置文件的路径--> <init-param> <param-name>contextConfigLocation</param-name> <param-value>classpath:spring-mvc.xml</param-value> </init-param> <!--设置启动即加载--> <load-on-startup>1</load-on-startup> </servlet> <servlet-mapping> <servlet-name>dispatcherServlet</servlet-name> <url‐pattern>/</url‐pattern> </servlet‐mapping>
参考链接