本文介绍hexo的搭建,并下载更新yilia主题示例
注:确保安装了node和git
1 安装hexo
- 先创建一个文件夹(用来存放所有blog的东西),然后
cd到该文件夹下。 - 安装hexo命令:npm i -g hexo
- 初始化命令:
hexo init,初始化完成之后打开所在的文件夹可以看到以下文件:
文件解释:
- node_modules:是依赖包
- public:存放的是生成的页面
- scaffolds:命令生成文章等的模板
- source:用命令创建的各种文章
- themes:主题
- _config.yml:整个博客的配置
- db.json:source解析所得到的
- package.json:项目所需模块项目的配置信息
2 搭桥到github
搭建好自己的远程git仓库并和本地git客户端联通
用编辑器打开你的blog项目,修改
_config.yml文件的一些配置(冒号之后都是有一个半角空格的):1
2
3
4deploy:
type: git
repo: https://github.com/YourgithubName/YourgithubName.github.io.git
branch: master回到gitbash中,进入你的blog目录,分别执行以下命令:
1
2
3hexo clean
hexo generate
hexo server注:hexo 3.0把服务器独立成个别模块,需要单独安装:
npm i hexo-server。打开浏览器输入:
http://localhost:4000。 至此本地ok
3 修改及配置主题
hexo初始化之后默认的主题是
landscape, 然后你可以去这个地址里面找到你想要的主题。在github中搜索你要的主题名称,里面都会有该主题的如何使用的介绍 本文选的是yilia在当前项目页,输入以下命令:
1
git clone https://github.com/litten/hexo-theme-yilia.git themes/yilia
回到gitbash中,进入你的blog目录, 编辑_config.yml, 找到theme项,theme后面的内容修改为yilia(初始化为:landscape) (不是themes/yilia下的__config.yml文件)
1
2
3
4
5
6
7
8# Extensions
## Plugins: https://hexo.io/plugins/
## Themes: https://hexo.io/themes/
theme: yilia
# Deployment
## Docs: https://hexo.io/docs/deployment.html
#coding: git@git.coding.net:JansZeng/hexoblog.git,master然后,重新编译,启动:
1
2
3
4hexo clean
hexo g
hexo s # 本地启动
hexo d # 推到远程git服务注:如果出现:
1
ERROR Deployer not found: git
执行以下命令:
1
npm install hexo-deployer-git --save
然后在执行:
1
hexo d
4 Hexo yilia 主题一揽子使用方案
4.1 查看所有文件,提示缺失模块
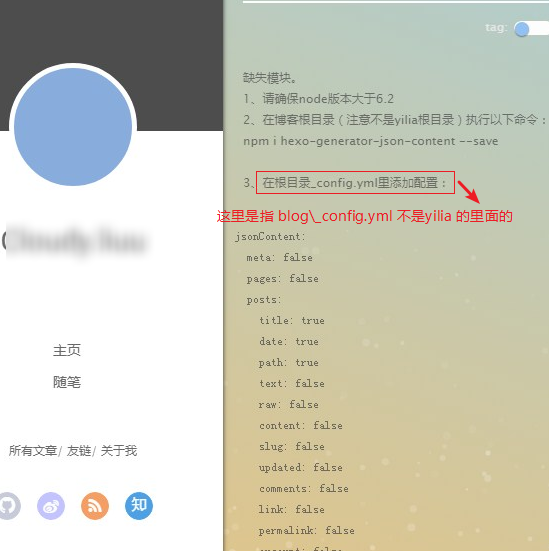
yilia 在首次使用时,点击所有文章 时,会出现模块找不到的错误,可按照提示操作即可 注意一下,_config.yml 路径是指 根目录下的,而非 yilia 主题下的 config文件

模块缺失:
请确保node版本大于6.2
回到gitbash中,进入你的blog目录,执行
1
npm i hexo-generator-json-content --save
在blog目录下_config.yml里添加配置
1
2
3
4
5
6
7
8
9
10
11
12
13
14
15
16
17
18jsonContent:
meta: false
pages: false
posts:
title: true
date: true
path: true
text: false
raw: false
content: false
slug: false
updated: false
comments: false
link: false
permalink: false
excerpt: false
categories: false
tags: true
4.2 配置图片资源
添加图片资源文件夹。 路径为
themes/yilia/source/下,可添加一个assets文件夹,里面存放图片资源即可配置文件中直接引用即可。路径为
themes/yilia/_config.yml,找到如下即可1
2
3
4
5
6
7
8# 微信二维码图片
weixin: /assets/img/wechat.png
# 头像图片
avatar: /assets/img/head.jpg
# 网页图标
favicon: /assets/img/head.jpg
4.3 文章如何显示摘要
问题。点击主页时,发现所有文章都是全文显示,不利于查找,可控制显示的字数
解决办法。 在你 MD 格式文章正文插入
<!-- more -->即可,只会显示它之前的,此后的就不显示,点击文章标题,全文阅读才可看到,同时注释掉以下themes/yilia/_config.yml,重复1
# excerpt_link: more

4.4 文章显示目录
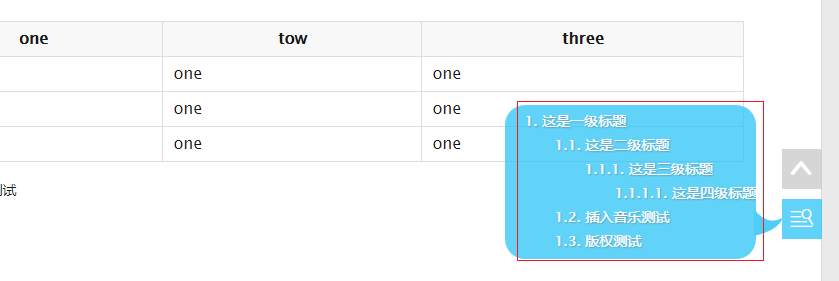
增加文章目录 TOC(table of content ),方便阅读文章, 在 themes/yilia/_config.ym中进行配置 toc: 2即可,它会将你 Markdown 语法的标题,生成目录,目录查看在右下角。

4.5 增加归档菜单
修改 themes/yilia/_config.yml
1 | menu: |